Can one image become a useful product shot? How long does it take, and are higher settings worth the wait? We explore these questions with headphones, a glass bottle and an interior, showing the input images, finished clips and generation times. The calculations run on a single server with an RTX PRO 6000 Blackwell Max-Q and 96 GB of GPU memory.
The finished footage is the main point of this comparison. We report how long it takes to produce a file, show the input images and make the clips available at different settings. This lets you consider both speed and whether the resulting movement suits the shot you have in mind.
Results at a glance
All 12 measured variants produced a complete, silent clip lasting about 5.1 seconds. Generation took 5.0–38.2 minutes, depending on the scene, resolution and step count. The observed peak GPU memory use ranged from 68.8 to 69.6 GiB across those runs.
The practical starting point is 480p with 20 steps: it lets you inspect a first interpretation of the shot in roughly five minutes in this series. Moving to 720p or more steps is a separate creative choice as well as a longer calculation. Our sampled frames show changes in framing and lighting, not an automatic quality win for the largest settings.
Prefer to see the results first? Jump to the headphones, bottle or interior. Each clip shows its settings and generation time.
What does Wan2.2 actually do?
Wan2.2 is a family of video-generation models. We chose I2V-A14B, which creates a video from an image and a written description. The image establishes the appearance of the scene; the text might ask the model to “slowly move the camera towards the product”. This is different from editing existing footage or faithfully rendering a 3D project. The model predicts movement; it does not know the physical construction of the object in the picture.
Wan2.2 generates the video, ComfyUI connects the workflow stages, and PyTorch performs the GPU calculations. The setup details are at the end. The official Wan2.2 documentation describes I2V-A14B and its supported resolutions, while the ComfyUI guide explains how to run it with native nodes.
In this test, video generation runs on the server being measured, without sending the generation task to an external API. The input images are synthetic illustrations made with an AI tool elsewhere. They are neither photographs of real products nor pictures of our hardware. We keep these two stages separate: the measurements here cover video generation only.
What are we comparing, and how should you read the results?
We prepared three tasks: a shot of headphones, a glass bottle presentation and a slow camera move through an interior. Each tests something slightly different. The headphones have a distinctive shape, the bottle introduces reflections and small lettering, and the room adds straight lines and relationships between objects.
Here, 480p means a video measuring 832 × 480 pixels. 720p means 1280 × 720. More pixels provide room for finer detail, but also give the GPU more work. We do not assume that increasing the resolution will automatically correct inconsistent movement or lettering.
We also compare 20 and 40 steps in total. A step is one stage in the model's process of building the image. It is not a video frame or a frame-per-second setting. The longer variant gives the model more computational steps; whether that difference is useful depends on the finished clip, not simply on choosing the larger number.
The comparison contains 12 measured clips: three scenes, two resolutions and two step counts. Each combination was generated once. One separate warm-up ran before the measured series and is not included in the three scene tables or galleries.
Each clip contains 81 frames played at 16 fps, lasting approximately 5.1 seconds. The server has 96 GB of system RAM, separate from the GPU's 96 GB of VRAM.
All variants use one seed fixed in advance. A seed selects a particular generation variant at otherwise unchanged settings. Each time in the tables comes from one execution of that configuration; it is not an average or median. This series does not measure timing repeatability or variation across multiple seeds.
Our visual comments describe six sampled frames from each clip. They help compare framing, recognisable shapes and lighting, but are not a full-motion assessment. The complete videos are available below so you can also inspect the movement yourself.
Example 1: headphones and a gentle camera move
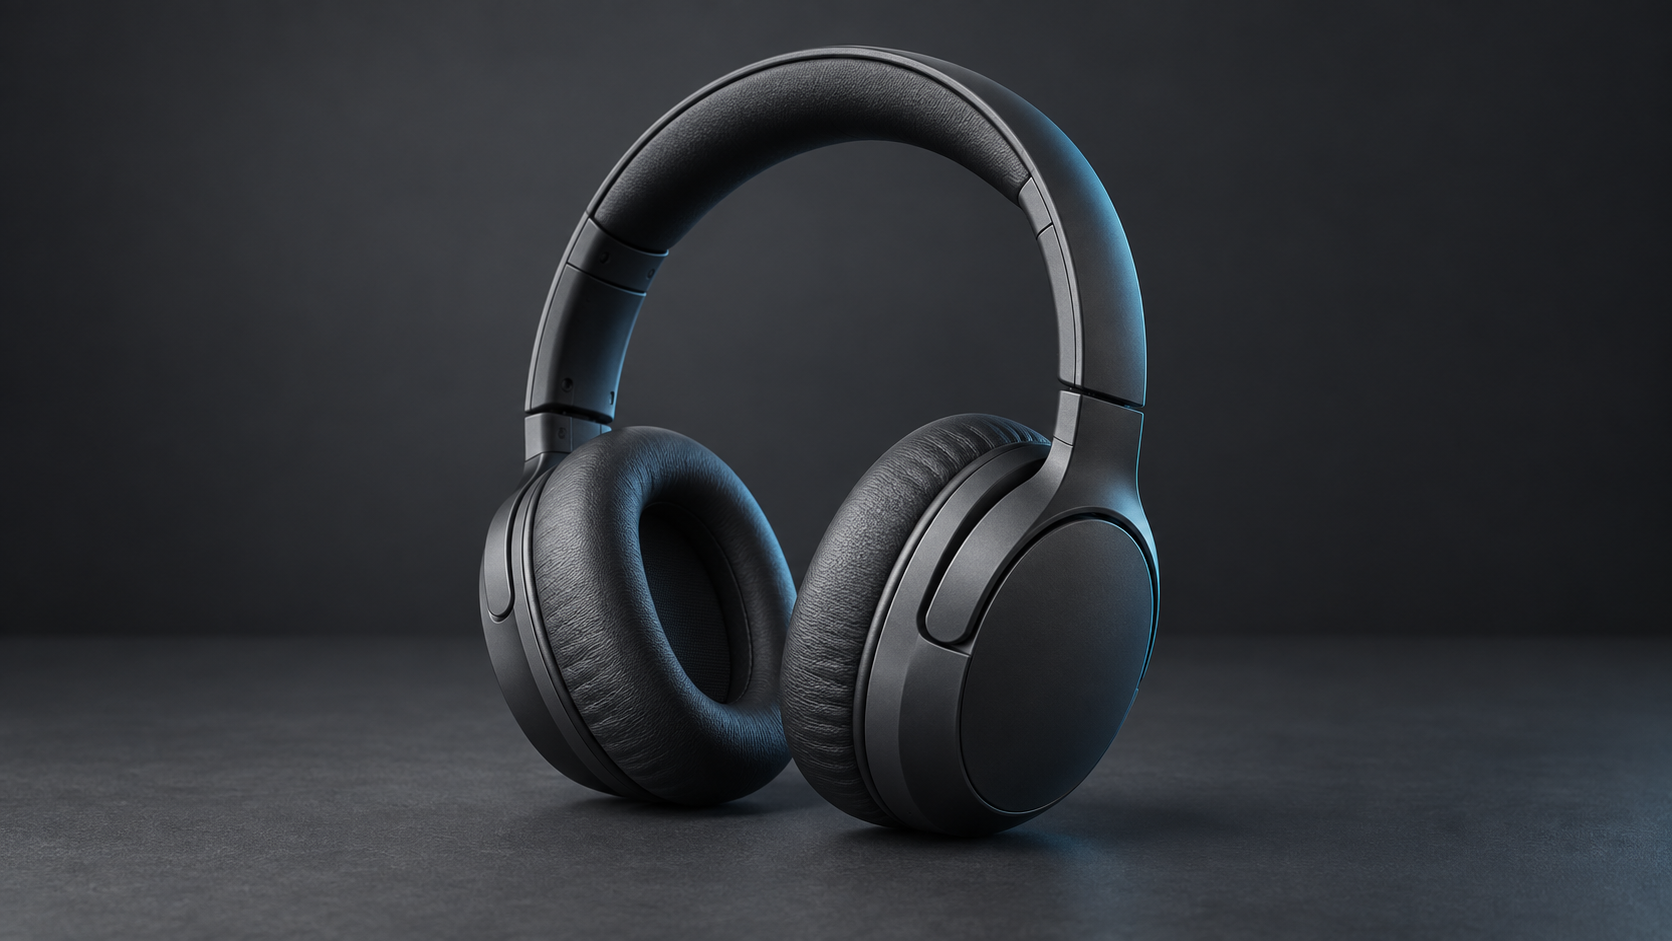
This is a straightforward starting point for a product presentation. We want the camera to move slowly towards the object while preserving its shape, colour and position. We do not ask for a dramatic rotation or a view of its unseen rear. A short move like this could be considered for a product page, the opening of a presentation or a sequence in a larger edit.
While playing the clips, watch the shape of the headband and both ear cups.
Headphones — synthetic input image
Silent videos. Select the play control to start an individual clip.
| Resolution | Steps | Generation time [min] | Observed peak VRAM [GiB] |
|---|---|---|---|
| 832 × 480 | 20 | 5.1 | 68.8 |
| 832 × 480 | 40 | 10.1 | 68.9 |
| 1280 × 720 | 20 | 18.9 | 69.5 |
| 1280 × 720 | 40 | 38.2 | 69.6 |
In the sampled frames, the headphones remain recognisable, but the model does more than simply move closer. The view changes from a three-quarter angle towards a more frontal presentation of both ear cups, with a turquoise reflection moving across the outer surfaces. That is an important distinction if your brief calls for a strictly controlled camera move.
The 20-step and 40-step versions follow a very similar overall direction. In the 720p samples, the outer side of the right ear cup is more strongly lit at 40 steps than at 20. That changes the look of the shot; it does not establish 40 steps as a general quality winner. The tables make the time trade-off visible, while the clips let you decide which interpretation suits the product presentation.
For a final choice, view the downloaded file at its native resolution. The reduced players cannot show the full difference in available pixel detail. Our starting choice for exploring this shot would be 480p with 20 steps: it took 5.1 minutes, compared with 38.2 minutes for 720p with 40 steps.
For a real project, the starting point would be your own photograph, with the necessary rights to use it. It is worth testing one simple shot first. If the product changes shape, attractive lighting is not enough to make the footage an accurate presentation. A convincing, restrained camera move can also be more useful than an elaborate animation that invents parts of the product.
Example 2: a bottle, reflections and label text
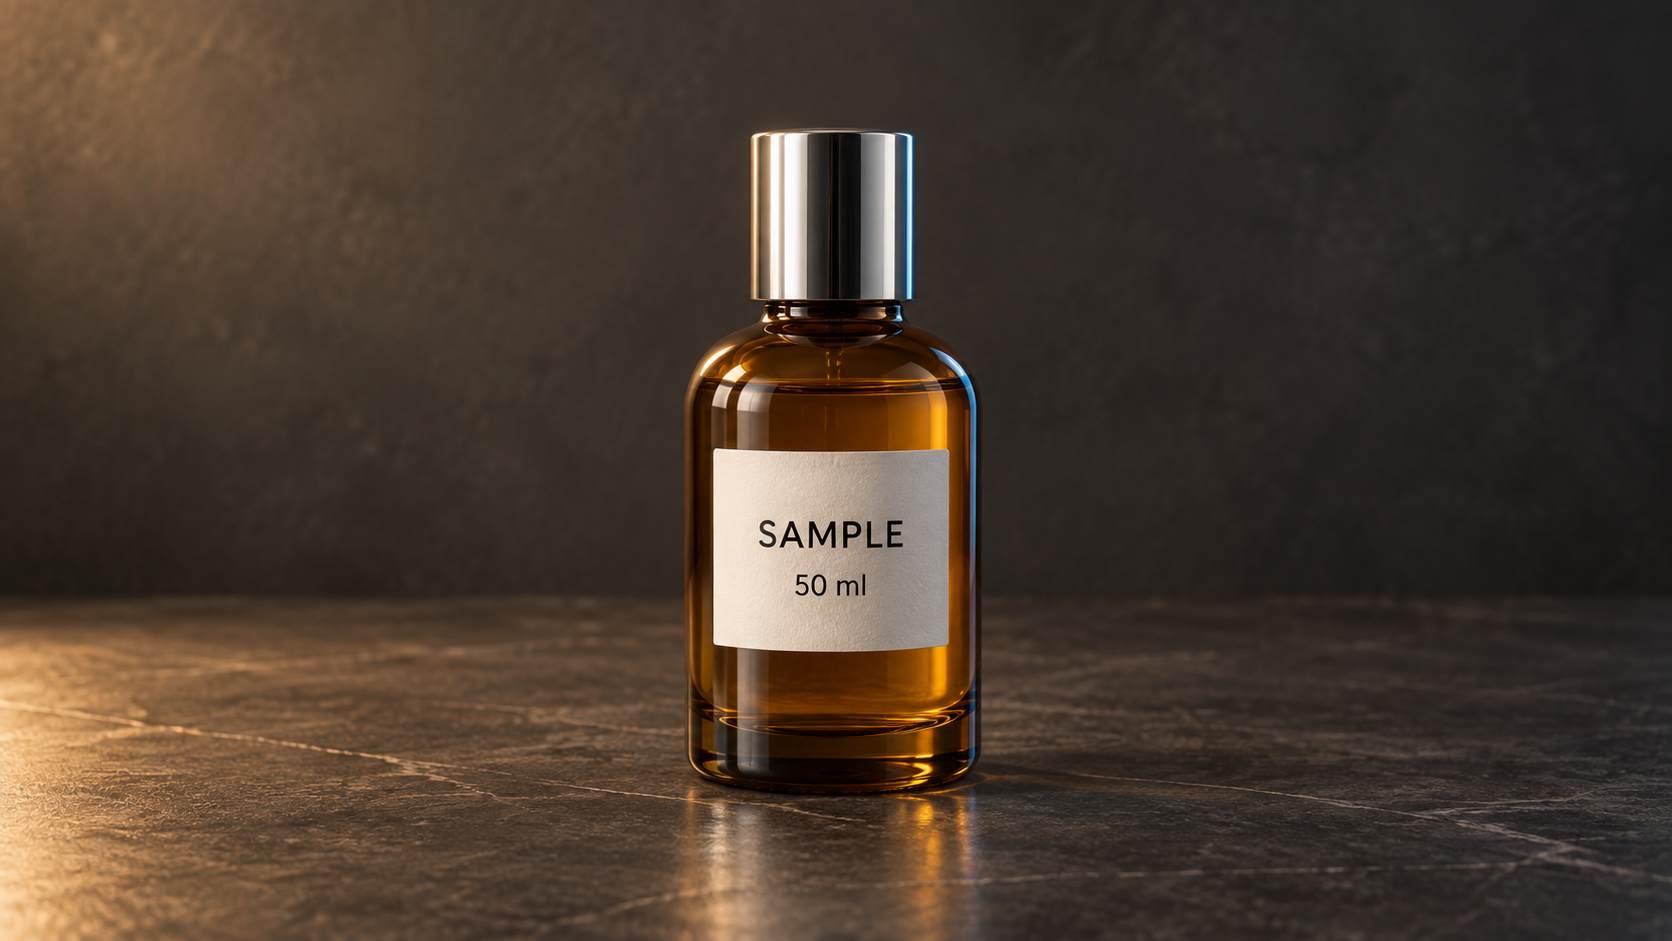
A glass bottle is more demanding: the light should behave plausibly, the outline should remain stable and the lettering on the label should not change. The input image therefore includes the short text “SAMPLE” and “50 ml”. These are deliberate assessment details, not advertising for an existing brand.
Check whether the lettering remains readable in motion, not just in the first frame.
Bottle with a SAMPLE label — synthetic input image
Silent videos. Select the play control to start an individual clip.
| Resolution | Steps | Generation time [min] | Observed peak VRAM [GiB] |
|---|---|---|---|
| 832 × 480 | 20 | 5.0 | 68.8 |
| 832 × 480 | 40 | 10.2 | 68.9 |
| 1280 × 720 | 20 | 19.2 | 69.5 |
| 1280 × 720 | 40 | 37.6 | 69.6 |
Both 480p versions show the bottle occupying progressively more of the sampled frames. It stays near the centre, with its amber colour, silver cap and pale label still recognisable. The 20-step and 40-step versions take a similar approach to the close-up; the most visible differences are in reflections and lighting rather than a clearly different composition.
The 720p version at 20 steps is more restrained in how much the bottle grows within the frame. At 40 steps, its size changes least: a growing bright patch on the left of the tabletop and a brighter background become the more noticeable effect. For a product shot, the choice is therefore partly between a closer view of the object and a quieter presentation driven by changing light.
The label remains recognisable as a pale area with two lines of text in these samples. This is not a verification of every letter throughout the clip; the small, reduced contact-sheet views are insufficient for that judgement.
The main practical use is to explore the shot, lighting and movement. If the final footage requires an exact logo, price, ingredient list or product marking, those details need their own accuracy check. In many projects, adding the final text in an editing application is a sensible approach. Successfully generating a file does not mean that it is ready for publication.
Example 3: an interior and a sense of space
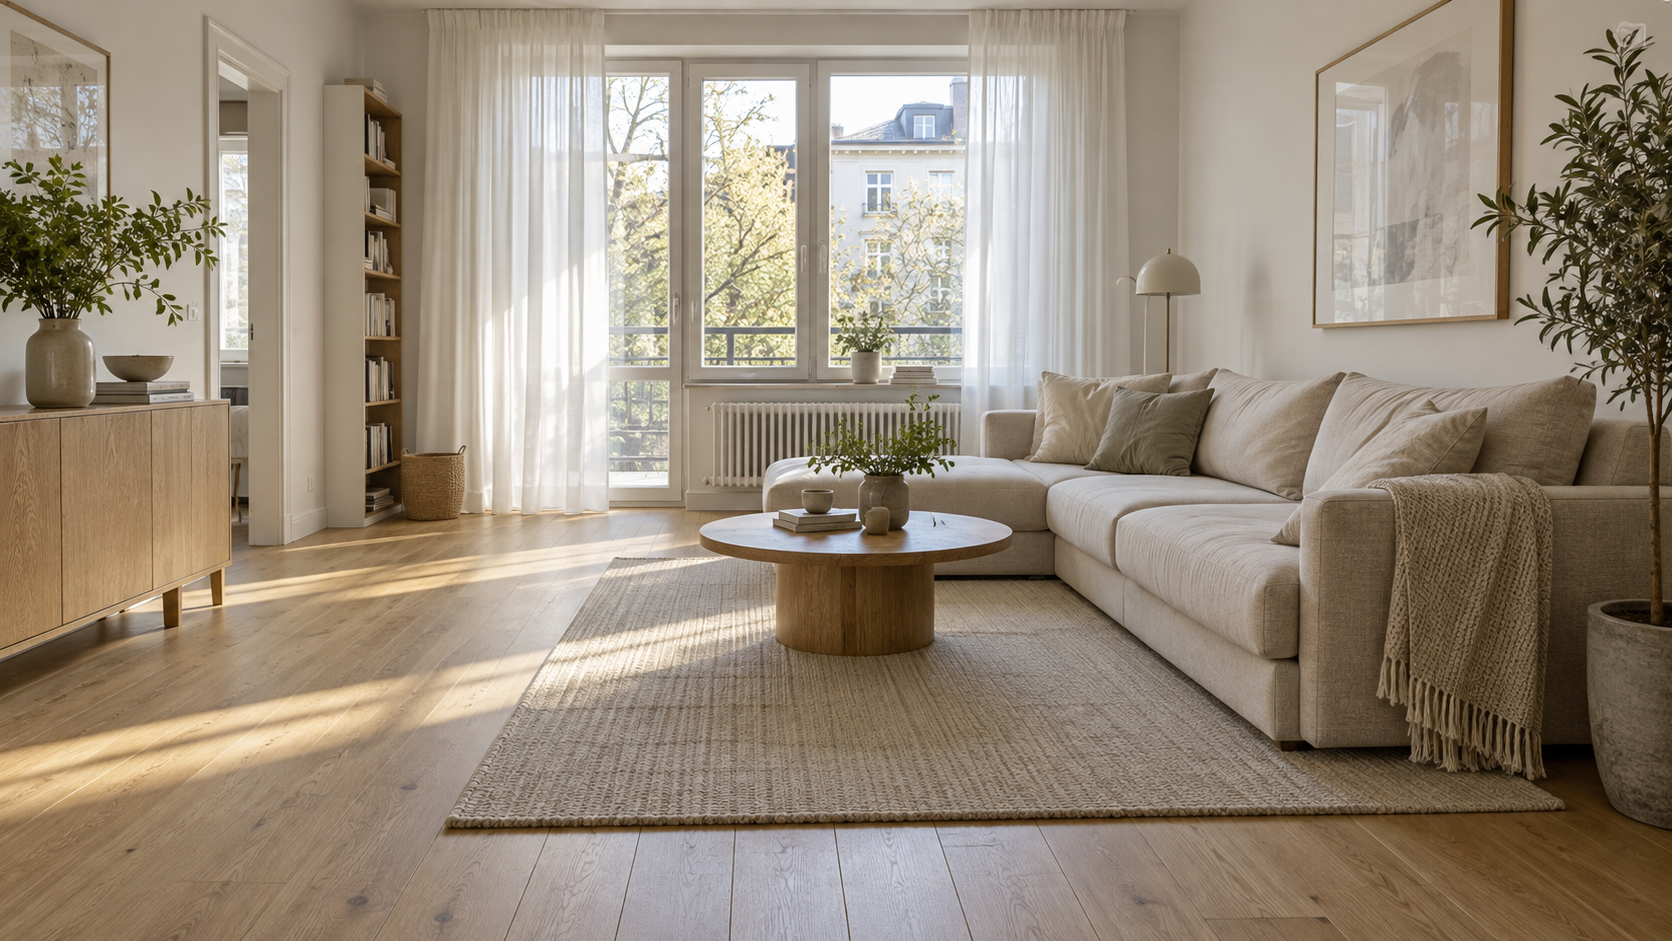
In this scene, the camera should move slowly forwards. The window, floor and furniture edges help reveal whether the room remains visually consistent. A slight movement of the curtain should bring the scene to life without changing its layout.
Watch the window frame and furniture edges: do their shapes remain consistent as the camera moves?
Living room — synthetic input image
Silent videos. Select the play control to start an individual clip.
| Resolution | Steps | Generation time [min] | Observed peak VRAM [GiB] |
|---|---|---|---|
| 832 × 480 | 20 | 5.2 | 68.8 |
| 832 × 480 | 40 | 10.0 | 68.9 |
| 1280 × 720 | 20 | 19.2 | 69.5 |
| 1280 × 720 | 40 | 37.9 | 69.6 |
The coffee table is the easiest reference point. In both 480p versions it grows across the sampled frames, the cabinet on the left leaves the view, and the sofa is increasingly cropped on the right. The main arrangement remains recognisable: sofa to the right, bookcase to the left and window ahead. The final compositions at 20 and 40 steps are similar.
At 720p and 20 steps, the later samples become noticeably brighter, particularly around the floor and window, while almost the whole tabletop remains visible at the end. The 40-step variant gives the most pronounced change of framing: the table extends beyond the bottom edge and the vase and branches become a large foreground subject.
That closer view could suit a presentation of the room's atmosphere or materials. It is less useful if the aim is to keep the broad room layout visible throughout. The settings have changed the interpretation of the shot, not merely the number of visible details.
Shots like this could convey the atmosphere of an interior, an early design idea or a proposed visual direction. They do not replace an accurate visualisation based on a project's dimensions and geometry. If the purpose is to show the layout of an apartment faithfully, check that the AI has not moved a window, a piece of furniture or a wall. Our separate Blender benchmark covers controlled rendering of 3D scenes.
480p or 720p? Choose the goal before the settings
Across the three scenes, 480p with 20 steps took 5.0–5.2 minutes. At 40 steps it took 10.0–10.2 minutes. The 720p variants took 18.9–19.2 minutes at 20 steps and 37.6–38.2 minutes at 40 steps. These are the ranges of the individual scene results, not timing variation from repeated executions of one scene.
For the same scene and step count, moving from 480p to 720p took approximately 3.7–3.8 times as long. Moving from 20 to 40 steps took approximately 1.9–2.0 times as long. These ratios compare the actual runs, rather than guaranteeing a multiplier for future clips.
The extra wait did not correspond to one universal visual improvement in the sampled frames. The bottle's 720p/40 version emphasises changing light, while the interior's 720p/40 version moves towards a much tighter composition. A useful next step is to choose the result that fits the brief, not automatically the one with the highest settings.
A lower resolution can be useful for testing the intended movement and scene description. At that stage, the key questions may be whether the camera moves where you want it to and whether the product keeps its identity. Once a shot looks promising, you can try a higher-resolution variant and examine its detail.
This is a way to organise the work, not a promise that increasing the resolution will reproduce exactly the same video. Even with the same seed, the calculations change and the output may differ. Compare the actual pair of clips, not just the settings in their names.
This series does not measure native 1080p or 4K generation, upscaling after generation, or additional frames created by another model. Enlarging a video does not make it a video generated natively at the higher resolution. Those extra stages require their own performance measurements and quality assessment.
How long does it take: the first video and later runs
Starting the ComfyUI application took 5.0 seconds. The separate first warm-up, using the headphones at 480p and 20 steps, then took 5.3 minutes. Application startup plus that first clip took 5.4 minutes in total.
The first measured clip used the same scene and settings and took 5.1 minutes. This gives a concrete picture of the first task and the next task in this run. One pair does not establish a repeatable startup penalty or a statistical speed-up, and neither timing includes downloading or installing the environment.
Generation time includes executing the task and saving the MP4. For the first task after starting ComfyUI, it also includes the required model loading. Application startup is reported separately. Model downloads and transferring the video to the user are excluded.
This distinction matters when planning a workflow. A server producing many variations in succession operates differently from an environment started from scratch for one short clip. We do not, however, turn a few examples into a guaranteed number of approved adverts per day. The human time needed to choose a shot, make revisions and complete the edit is a separate cost.
What does a large amount of GPU memory offer?
The observed peak GPU memory use across the 12 measured runs was 68.8–69.6 GiB. That is the largest sampled reading for each task, not an average. The modest difference between these peaks should not obscure the much larger difference in generation time: similar memory use does not mean similar waiting time.
For the same measured series, the whole-host RAM peaks ranged from 8.1 to 12.1 GiB, while the ComfyUI process RSS peaks ranged from 4.9 to 9.0 GiB. During the separate warm-up, the corresponding peaks were 12.4 GiB and 26.4 GiB, with a VRAM peak of 62.3 GiB. Whole-host total-minus-available memory and process RSS use different accounting definitions, and these are separately observed peaks. File-mapped memory can be accounted for differently in them. Do not add them together or treat them as interchangeable readings.
These values describe this prepared environment, not a minimum RAM requirement for installing or running it. The machine used for the test had 96 GB of system RAM.
VRAM is the GPU's own memory. It holds model components and the data needed during generation. RAM is system memory and serves a different role. More GPU memory gives you greater flexibility when running a demanding configuration, but its capacity alone tells you neither how good a video will look nor how long a particular scene will take.
These results describe the tested server, the stated model variant and the way we ran it. Comparing GPUs with less memory would require separate measurements. Our separate VRAM and RAM comparison discusses sharing computation and data between the GPU and system memory for language models.
Who might find this a useful starting point?
For a creative team, the attraction is being able to produce successive variations with a toolset under its own control. For an online shop, it could mean exploring short animations of selected products. For someone preparing visualisations, it could be a way to test camera movement and the atmosphere of a shot. These are suggested applications, not measured improvements in customers' sales.
In practice, two things matter: is the output useful, and does the time needed to produce it fit the workflow? Not every result has to be finished footage ready for release. Sometimes a useful outcome is a rough visual that helps a team choose a direction before committing to a more expensive production. In other cases, accurate product presentation is essential and the requirements for consistency are much stricter.
A GPU server is not a ready-to-use subscription to an online video generator. The environment needs to be prepared, the models downloaded and the workflow established. This article describes a working setup and the results of testing it, not a promise that every application will be deployed automatically when the service is purchased. View the server configuration or tell us about your planned video work.
Our conclusion
On this server, Wan2.2 turned each of the three synthetic input scenes into a complete, short video in all four tested configurations. For exploring an idea, 480p with 20 steps is a practical starting point in this series: it gives you a concrete result to review before committing to the longer settings.
The more important decision comes after generation. Does the product still look right? Is the framing useful? Is the model's interpretation of the camera move what you wanted? Our sampled frames show why these questions matter: the headphones change viewing angle, the bottle varies between a close-up and an emphasis on light, and the room can turn into a much tighter foreground composition.
Use the complete clips to make that choice. Higher resolution and more steps offer another result to assess, not a guarantee that the shot is more faithful or ready for release. If a variant meets the brief, it can become a starting point for editing; if it does not, revise the shot description or input before spending more time on larger settings.
Technical details
Configuration and measurement scope
| Component | Tested configuration |
|---|---|
| GPU | NVIDIA RTX PRO 6000 Blackwell Max-Q Workstation Edition, 96 GB VRAM |
| GPU power limit | 300 W, no manual overclocking |
| Processor | AMD EPYC 4565P, 16 cores / 32 threads |
| System RAM | 96 GB |
| Operating system | Rocky Linux 10.2 |
| NVIDIA driver | 595.91.07 |
| ComfyUI | 0.37.0, commit 73c9bad4d21e7addbe1d13bc92eee0f1431b017d |
| PyTorch / environment CUDA | 2.9.1+cu130 / 13.0 |
This is the configuration actually used for the measurements. Versions and file hashes are recorded in the attached protocol so that a later software or model update does not silently change the task being compared.
The shared workflow uses Wan2.2 I2V-A14B with two FP16 diffusion experts, a scaled-FP8 UMT5 text encoder and the wan_2.1_vae decoder. FP16 and FP8 describe the storage format of the respective model weights, not the video's resolution. We used no additional ComfyUI nodes or separate generator to improve the output.
| Setting | Value |
|---|---|
| Sampler / scheduler | Euler / simple |
| CFG / shift | 3.5 / 5 |
| Step split between experts | 20 total: 10 + 10; 40 total: 20 + 20 |
| Frames / playback rate | 81 / 16 fps |
| Videos per task | 1 |
| Seed | 104729 |
| Encoding | H.264, MP4, yuv420p, CRF 18, silent |
| Input preparation | Bilinear scaling and centre cropping to the video dimensions |
The dimensions 832 × 480 and 1280 × 720 have slightly different aspect ratios. The original input images measure 1672 × 941 pixels. This comparison covers landscape shots; it does not test portrait reels or the requirements of every Wan2.2 variant.
A “cold start” means a new ComfyUI process, without clearing the operating system's file cache. Subsequent tasks run in the same process. Model-loading nodes are retained, but the memory manager can partially unload their data. This does not mean that all weights stay in VRAM at all times. Text and image conditioning, both generation stages and frame decoding are recomputed for every run.
The ComfyUI launch options included --highvram --reserve-vram 8 --cache-classic --preview-method none. These matter when reproducing memory management, caching and the disabled generation preview. We also set --disable-metadata --disable-all-custom-nodes --disable-api-nodes; the interface listened only locally on the server. A workflow file alone does not replace these application settings.
Memory readings are sampled approximately once per second. The observation window includes the task and final file verification; generation timing ends earlier, after the MP4 has been saved. A table's peak is the highest observed sample, not a guaranteed maximum between readings. Whole-host RAM means total minus available system memory; RSS is a separate reading for the ComfyUI process. GiB is a binary unit defined as 1024³ bytes. These observations are not minimum memory requirements for running the environment.
How to reproduce the comparison
The files below the article contain the settings, prompts, individual run results and the ComfyUI workflow in API format. That workflow file is intended for the API; it does not promise an identical visual node layout when dragged into the editor. SHA-256 checksums let you confirm that you are comparing the same files.
This series uses protocol gsh-wan22-i2v/1.0. protocol.json describes the environment and execution order; workflows.json contains the complete scene prompts and settings. The prompts are in English. The Polish and English articles present the same measurements, not two separate tests.
- Prepare the ComfyUI, PyTorch and model versions listed in
protocol.json. Check the model-file hashes rather than relying on filenames alone. - Download the input images from the galleries. The supplied WebP files are lossless: their decoded RGB pixels match the original PNG inputs used in the measurements.
- Select the required run's
api_promptfield fromworkflows.json. Point theLoadImagenode to the downloaded WebP instead of the original PNG filename. Keep the prompt, dimensions, step count and seed unchanged. - Give each new execution a fresh
_benchmark_nonce, using the same value in all five nodes containing that field. This marker forces recomputation in the tested ComfyUI version; it does not change the random seed. - Keep the first warm-up separate and follow the recorded run order. Compare completed files and the same timing scope, not only the sampler's progress report.
results.csv and results.json also include the warm-up, labelled separately from the 12 main runs. Those files retain the precision of the source numbers; the article and tables round measurements to one decimal place. media-integrity.json describes image and video equivalence before and after publication preparation. Original and public workflow hashes differ because the private execution marker has been replaced with an explicit placeholder.
How we assess the videos
For each of the 12 measured clips, we inspected a contact sheet containing frames 0, 16, 32, 48, 64 and 80. Those samples support the observations about framing, recognisable silhouettes and lighting in the scene sections. They do not constitute a full playback review and do not establish smooth motion, absence of flicker, or absence of deformations between the sampled frames. Reduced contact sheets also do not establish the native-resolution sharpness of one variant relative to another.
All 12 published files passed the technical decoding checks. Publication preparation used a faststart remux without re-encoding, and verified that decoded frames and presentation timestamps matched the original outputs. This confirms the media preparation and file integrity, not the artistic quality of the motion. The complete MP4 files are available in the galleries for playback and download.
The conclusions apply to the three scenes shown here, not a general ranking of video models. The clips are silent, with no manual corrections to individual frames and no results added from other generators. The galleries show all variants in the published comparison, without selecting only the best-looking results afterwards.